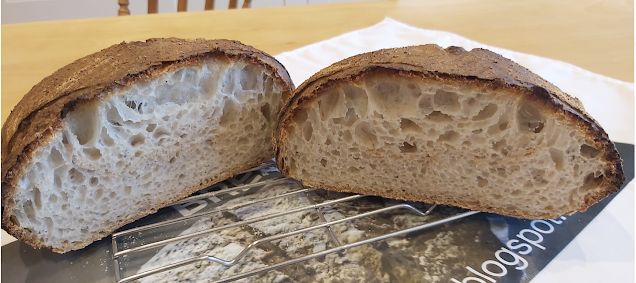
Pain au Levain
Pain au Levain is widely considered to be the gold standard for fermented bread using the wild yeast contained within flour.
Actually, it's sourdough by another name, and a slightly more circuitous route.
The Americans of San Francisco, Portland, Boston and New York have adopted it 'bigly', as have the Germans who refer to it as 'Sauerteig'. At times, they may dispute the superiority of the French version, the standard for which was laid down by decree in 1993.
Actually, it's not one specific bread, but more a category of bread. Primarily, it's made of white flour, sometimes supplemented with rye, multigrain or wholewheat flours.
French levains are made using traditional whole flour wild yeast starters, while American versions often combine sourdough starters with commercial yeasts to help maintain a standardised rise.
So, let's go back to our true and traditional French Pain au Levain. You'll note that it's a fairly lengthy procedure but it involves very little work...you just need to be around to carry out one or two tasks when and as required. Think of it as ideal for 'Lockdown'!
The process goes a considerable way to explain why the morning baguette you buy from the boulangerie has taken so long to bake.
I've often driven through the night across France and entered sleepy towns in the early hours and wondered why the local baker is out and about - washing his car or doing odd jobs...he's obviously filling in the hours while the magic is at work inside the bakery.
You'll notice that this recipe will produce a single, average-sized loaf. I'd suggest you work your way through the recipe as it stands. Maybe, next time, you'll double the quantities and either make a very large loaf or two small ones of this size.
Because we're making an authentic French Pain au Levain, we have to follow one or two specific rules:
1. We must use a French flour - I'm using T55 type flour, traditionally used by French bakers for baguettes and batards. It's easy to acquire, either from a decent supermarket or online.
2. The banneton has to be floured using T55 flour - the French decree of 93-1074 (September 13th 1993) stipulated that bannetons must not be floured using rice flour or semolina - ou c'est à la guillotine pour vous, bon monsieur ...
INGREDIENTS
330 gms T55 white French bread flour
221 mls water
100 gms sourdough starter
8 gms salt
and that's it.
Eventually, you'll also need a suitably sized banneton and a preheated oven to as near to 250 degrees C as you can get and a baking stone (or pizza stone). But, these won't be used until tomorrow, so there's no rush.
DAY ONE
Handmixing
If you're mixing by hand, place the water and the starter in a bowl and add the flour and then the salt.
Bring all the ingredients together and knead on floured board, slowly at first and then using a "stretch and slap" technique for about 10 minutes.
Machine mixing
If you're mixing by machine, place the water and the starter in the pan and add the flour and the salt.
Run the machine on a short dough cycle (I'd suggest a Pizza cycle . The cycle moves through mix to a short rise then knead. Stop the machine before the final rise...approximately 30 minutes into the programme.)
Next stage
Lightly oil a mixing bowl.
Place the dough in the bowl and cover with clingfilm. (This is often referred to as the 'bulk ferment')
 |
| Smooth, silky dough - ready for the fridge |
Put it in the fridge for 10 hours.
After 4 hours: remove the dough from the fridge, gently stretch and fold about eight times and then return it to the bowl (re-cover the bowl with the cling film) and to the fridge.
After a further 4 hours: remove the dough from the fridge, gently stretch and fold about eight times and then return it to the bowl (re-cover the bowl with the cling film) and to the fridge.
After a further two hours (4 + 4 + 2) : remove the dough from the fridge and pre-shape into a ball.
Lightly flour a board and let the dough rest for 15 minutes.
Line a banneton with flour - be very generous with the flour.
Reshape the dough into a ball. Try and be gentle as you don't want to lose the gas bubbles that are hiding in the dough.
Give the dough a final shape, place in the banneton (flour and cover with a tea towel or piece of parchment paper) and prove again for ten hours at normal room temperature.
 |
| In the banneton ready for the second 10 hr prove. |
DAY TWO
Preheat the baking stone / pizza stone and the oven to 250 degrees C or thereabouts. Make sure you put the stone into a COLD oven.
When the dough has risen to double the size, take a piece of baking parchment and either a metal tray or baker's peel and tip the banneton upside down onto the paper. If you've floured the banneton sufficiently, it should release. If it doesn't, send yourself a memo for next time and give it a tap for now.
Cut a cross shape into the dough using a lame or razor blade.
Place in the oven and, if you can, add a small bowl of water at the bottom of the oven to generate steam.
Drop the temperature to 230 degrees C.
The bake should take approxinately 40 - 45 minutes.
Remove from the oven and cool on a wire rack.
So, how do these processes work out out in 'real time'?
Here's a suggestion:


Comments
Post a Comment