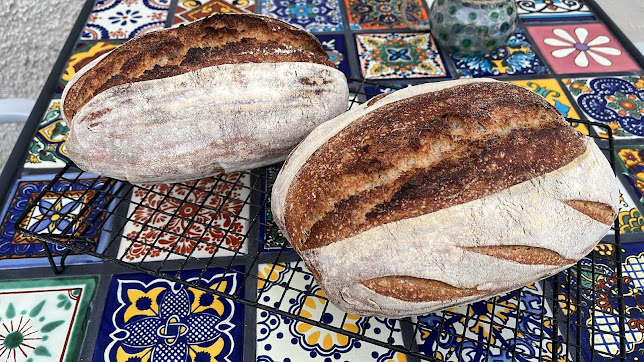
"Backwards Sourdough" (Hard Difficulty)
Difficulty
Welcome to another step-by-step recipe from BreadClub20. Why not drop by our main Facebook page by clicking here.... If you like what you see and enjoy the recipe, we hope you join us by 'Liking' and 'Subscribing'.
No! For the life of me, I can't work out why they call this 'Backwards Sourdough'!
I came across this technique from watching self-taught baker Mary Grace Quigley on Australian Broadcasting Corporation where they refer to it as 'Backwards Bread'. It also appeared in a slightly different form on The Brown Bakery site.
It's really a technique for producing sourdough easily and without giving it a lot of attention. Very much in the same vein as Dan Leppard's No-Knead Sourdough.
HEALTH WARNING
For the sake of this exercise, I wanted to follow the 'recipe'.
I'm not very good at following 'recipes'......and certainly not without questioning.
You'll find 'ponders' dotted about in what follows...
Anyway, here goes:
FORMULA
160 gms active starter
570 gms tepid water
16 gms crushed sea salt
600 gms strong white bread flour
150 gms rye flour
Hydration - 78.3%
Starter - 21.3%
21.3% presumes an awful lot
1. For a warm environment that's quite a lot of starter
2. The process requires this to be left out at room temperature for 10 hours. There's no reason for this arbitrary figure given a) the absence of a preferred temperature and b) the quantity of starter.
My kitchen was 20⁰C all day
PROCESS
Into a large bowl add the water, starter and salt.
Mix together
Add the flours, mix and then cover and wait for 15 minutes.
Stretch and fold the mixture into a dough.
I did two repetitions of stretch and fold at 15-minute intervals. It's quite a sticky dough
Cover and leave overnight (or for at least 10 hours)
Why? Why 10 hours? Is this supposed to double? Why?
OK - we'll leave it 10 hours...?
I left it for a little over 8 hours and was rather nervous at not being able to properly determine the growth during bulk fermentation.
Divide and shape into boules or batards according to your bannetons. Spend a little time ensuring you have good surface tension on the dough.
Place in bannetons, cover and leave to one side until you are ready to bake (probably 1 - 2 hours?)
Again, an arbitrary time - I went to bed and left mine for about 8 hours at 3⁰C (refrigerated)
Preheat your baking vessel and oven to 'Full' (240⁰C+)
Invert the banneton onto parchment paper. Score and mist with water.
Place into the baking vessel, cover and bake on full for 10 minutes.
Lower the heat to 225⁰C and continue to bake with the lid on for 20 minutes.
Remove the lid and continue to bake for about 15 minutes or more until golden brown and the internal temperature is about 98⁰C - or until it looks cooked.
I was pleasantly surprised at the way the loaves opened up and rise. Given that the dough felt quite heavy and was 'sticky' due to high hydration. Also, they didn't continue to ferment very much while in the refrigerator. But, clearly, there was still enough life in the bacteria and yeasts to deliver when it was baked.
Cool for at least two hours before cutting.
The Crumb?
Happy baking.
.jpeg)


.jpeg)


Comments
Post a Comment