Artisan Sourdough
2021 : World Bread Awards : Winner - Wales
Welcome to another step-by-step recipe from BreadClub20. Why not drop by our main Facebook page by clicking here.... If you like what you see and enjoy the recipe, we hope you go on to join us by 'Liking' and 'Subscribing'.
Today, we're going to make high hydration (81%) sourdough loaves and bake them in a Dutch Oven. If you haven't got a Dutch Oven, here are some alternatives:
(i) a large round or oval cast iron casserole with lid
(ii) a large metal stock pot with a reasonably tight fitting lid (oven proof, i.e. no plastic handles)
(iii) a Pyrex or other borosilicate casserole dish (round or oval)
(iv) an enamelled roaster with lid - round or oval
(v) a roasting dish with another inverted on the top as a lid (obviously the same size)
(vi)....surprise me!
There's not much to do using this recipe...but it does take time, so you need to be prepared beforehand.
BEFOREHAND
You need an active starter.
From the 'motherlode' that you should have in your refrigerator, extract 100 gms and let it reach room temperature.
Feed the 100 gms with 100 gms of strong white bread flour and 100 gms filtered tepid water.
Give it a good stir, cover it and leave it on the kitchen worktop overnight.
If you've forgotten to do this and it's morning, place it in a warm spot (at 24⁰C approx.) for about 3 - 5 hours and it will be ready to use.
If you have a rye or spelt starter - then you already know what you're doing...just prepare a starter ready for baking.
BAKE DAY
INGREDIENTS
700 gms strong white bread flour
180 gms wholemeal or whole wheat flour
700 gms of tepid unfiltered water
180 gms active ripe starter at 100% hydration
18 gms crushed sea salt
Also - rice flour or similar for dusting the bannetons and worktop
METHOD
1. Mix the flours together in a large bowl. Add the tepid water (at about 32⁰C) and mix until all the flour has been incorporated. Cover with a shower cap or cling film and rest in a warm place (approx 24⁰C - 26⁰C) for TWO hours.
2. Add the starter and spread it over the top of the mixture. Wet your hands and fold the edges into the middle. Then using a pinch and fold method, work the starter into the dough, thoroughly, until everything is well incorporated. Cover and rest in your warm place for 30 minutes. You can be quite firm here...think about how a machine would work and try to emulate the same technique. It's basically what happens when you use the Rubaud method
(Here's the Rubaud method demonstrated)
3. Add the salt and incorporate into the dough in exactly the same way as above. Cover and rest for 15 minutes.
4. Now carry out SIX sets of stretch and fold. The first three will be at 15 minute intervals and the last three will be at 30 minute intervals. Remember to cover and return the bowl to the warm place after every set.
Remember to wet your hands - not too much - it stops the dough sticking
I tend to lay out six teaspoons and put one away after every stretch and fold. When I run out of spoons, I know I've done my six.
Total time = 2¼hours.
(Here's a demonstration of how to stretch and fold)
5. Now, allow the dough to rest in your warm spot for a further 1½ - 2 hours. However, watch the dough, not the clock. When the dough has risen to 90% of its previous volume, it's ready. By now it will have lots of air bubbles on the top and there dough will be domed. Mark your container so you'll now when it's increased by 90%.
6. Oil or flour your work surface. I use a wooden board so I use rice flour. If you work on marble, granite or steel, oil might be easier.
7. Using damp hands and a wet scraper, ease the dough out onto the work surface. Scape some flour under the edges of the dough to make sure nothing is going to stick. Divide the dough into two equal portions.
8. With each portion in turn - fold over the edges into the middle and then flip the dough over gently. Then, using the edges of your palms, form a boule and develop some surface tension by pushing or pulling the dough towards you, turning it as you go. Just a few turns will do.
9. Allow the dough to rest for 20 minutes and then reshape before transferring the dough to a well-floured banneton.
Most people will tell you that dough has to be 'smooth side down' in the banneton with the seam uppermost. Try it the other way, you'll be surprised how good the outcome can be'.
10. Cover the bannetons with shower caps or place into plastic bags and seal. let them rest on the worktop for 10 minutes before moving to a low shelf in the refrigerator for 12 - 16 hours at as near to 3⁰C as you can achieve.
THE FOLLOWING MORNING
1. Preheat your oven and baking pots to 240⁰C (or higher if you can - 250⁰C is ideal).
2. When the oven is really hot, remove the loaves from the refrigerator. If your temperature has been low enough and they've been in there for at least 12 and probably more like 16 hours, they'll be ready for baking.
3. Transfer the dough onto parchment paper or a silicone sling and score quickly and firmly. Then, remove the lid of the pot and mist the inside. Place the dough in the pot, mist again and quickly replace the lid.
4. Bake with the lid on for 25 minutes at 240⁰C.
5. Remove the lid and lower the temperature to 230⁰C. Cotinue to bake for 15 - 25 minutes until the crust is a deep golden and caramelised.
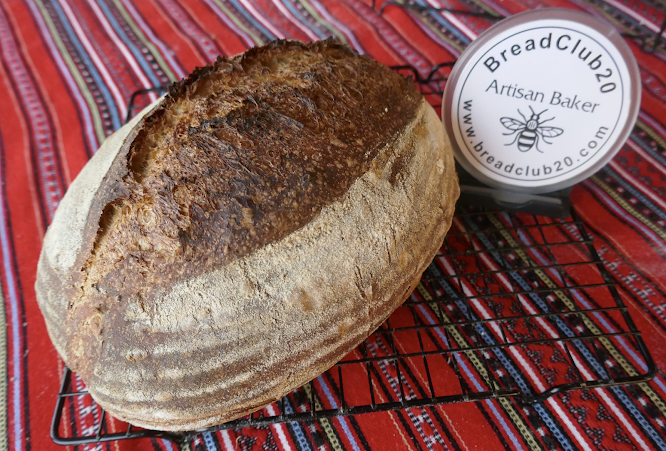
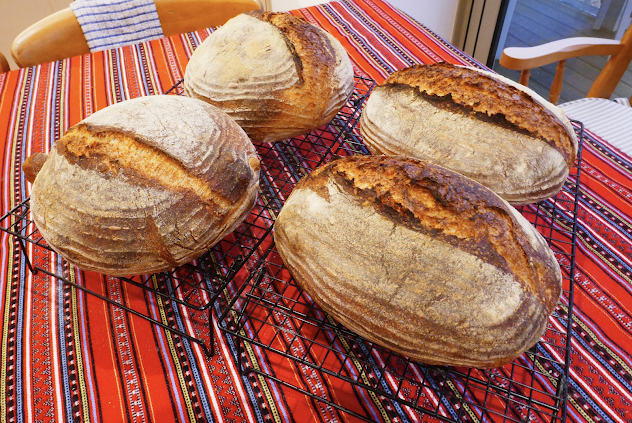
6. Remove the loaf from the pot and cool on a rack for a few hours to help the crumb to form and prevent a 'gummy' texture.


Comments
Post a Comment