Sourdough - handling 85% hydration
Welcome to another step-by-step recipe from BreadClub20. Why not drop by our main Facebook page by clicking here.... If you like what you see and enjoy the recipe, we hope you go on to join us by 'Liking' and 'Subscribing'.
Today, we're moving away from one of my own set recipes. Instead, we're going to work through a recipe and process that have been put online via YouTube by 'Autumn Kitchen' (Chiew See, a home baker in Malaysia)
The bread we're going to make is an 85% high hydration, open crumb sourdough. As it is high hydration, it requires careful handling. The video makes it look straightforward, let's see how this works in practice.
You will probably want to watch the video first. Then, we're going to work through the process, stage and by stage and you can then judge for yourselves how it turns out and whether it's feasible as part of your own bread repertoire...
OK, here's the video...
Now, let's take the ingredients and then move on to the method. The techniques of pinch and fold and coil folding and are demonstrated within the video:
INGREDIENTS (for one small loaf)
240 gms strong bread flour
60 gms whole wheat / wholemeal flour
250 mls tepid, filtered water
60 gms active sourdough starter
6 gms sea salt
METHOD
1. Autolyse - lightly mix 240 gms of strong bread flour with 60 gms of wholemeal / whole wheat flour
2. Autolyse - Add 250 mls of tepid, filtered water
3. Autolyse - Mix thoroughly until all the flour and water have been combined.
4. Autolyse - rest for one hour
5. Add 60 gms of active sourdough starter in two 30 gms batches (roughly judged). Thoroughly incorporate it using a 'pinch and fold' method (see video at 2':13"). Notice that the art is in gentle incorporation....trying not to tear the dough.
6. Rest for 10 - 15 minutes
7. Add 6 gms of sea salt, sprinkling it over the dough. Again, full incorporate using a pinch and fold method (see video at 3':29")
8. Stretch and Fold (Set 1). This is demonstrated within the video at point 4':07"
9. Rest for 10 - 15 minutes
10. Stretch and Fold (Set 2). This is demonstrated within the video at point 4'.54"
10. Rest for 10 - 15 minutes
12. Bench Light Fold, (Set 1). This technique is demonstrated within the video at point 5':31"
13. Rest until the dough has finished spreading (approximately 30 minutes)
14. Bench Light Fold (Set 2) . Demonstrated within the video at 7':35"
15. Prepare a large rectangular glass dish and spray it with light oil (olive or canola)
16. Place the dough in the glass dish. Cover and leave it to rest until it has spread (approximately 30 minutes)
17. Coil Fold (Set 1). This technique is demonstrated in the video at point 8':51"
18. Cover and rest the dough for 30 minutes
19. Coil Fold (Set 2). This is demonstrated in the video at point 10':32"
20. Cover and rest the dough for one hour.
21. Coil Fold (Set 3). This technique is demonstrated in the video at point 11':18"
22. Cover and rest the dough for one hour.
23. Shaping : (see point 12':30" in the video)
24. Place it in a 9 inch oval or 8 inch round banneton (well floured - I use rice flour)
25. Cover and place in a refrigerator overnight
26. The next day : preheat the oven to 250⁰C . Also, preheat your Dutch Oven or enamel roaster.
27. When the oven reaches heat, remove the dough from the fridge.
28. Flip it onto parchment paper or a bread sling and score off centre with a cut approximately one inch deep. Try to keep your blade at a 10⁰ angle to the loaf surface.
29. Place the loaf in the container, mist and replace lid.
29. Bake for 20 minutes with lid on at 250⁰c and then remove lid. Continue to bake for further 20 - 25 minutes at 220⁰C
30. Remove from the oven. Remove from the pot and allow to cool on a wire rack.
So, does mine look anything like the one in the video?
Well, it's attractive enough on the outside. It was quite a small loaf, so I decided to cook it as a boule in a Dutch Oven rather than making it into an oval and cooking it on cordierite with a ceramic cover.
On the inside? Yep, I think we're there. Even, open crumb. This was cut about an hour after it left the oven...the crumb is still setting, to be honest.
Verdict?
Open crumb, high hydration sourdough can be a long business. You need to be around for the whole event. Four and a half hours on Day One is a big chunk out of your day. Of course, you can build it in to a Baking Day and make / bake other goods as well.
What would I do differently?
I'd probably batch bake this. Double the quantities for each bowl and run three bowls alongside each other, so creating 6 loaves in total. That way, it becomes a more efficient use of time.
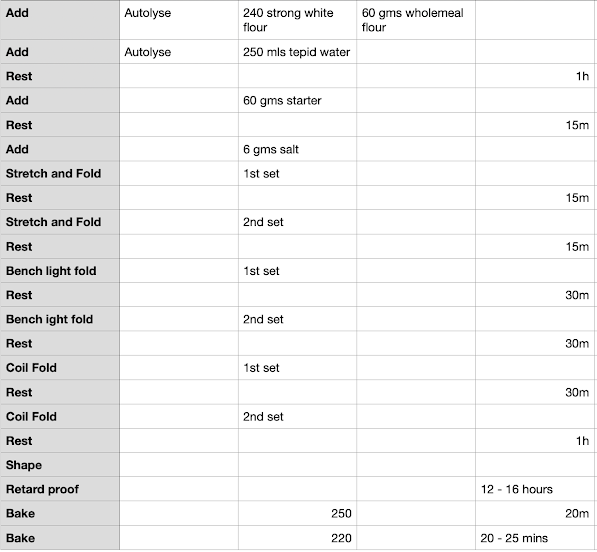
This chart might help keep things on track
Happy baking...


Comments
Post a Comment