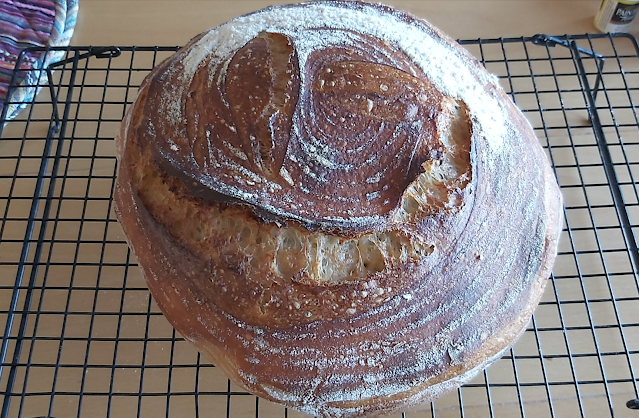
Sourdough - 80% hydration
Welcome to another step-by-step recipe from BreadClub20. Why not drop by our main Facebook page by clicking here.... If you like what you see and enjoy the recipe, we hope you go on to join us by 'Liking' and 'Subscribing'.
I had a message recently on the BreadClub20 Facebook group page (click HERE) from a new baker who asked, "What is all this discussion about 'holes' in sourdough? Why do people want holes?"
I thought, what a good question! Sometimes, it must seem to new bakers that we are more concerned with how bread looks, rather than how it tastes. We seem to have elevated the humble loaf into being an art form; rather than a staple part of our diet. In the way as nouveau cuisine presented us with plates containing hardly enough food to sustain a budgie and introduced such dreadful terms as jus, so, bread aficionados discuss shape and colour, scoring and rise. Woe betide anyone who blunders in with 'What's it like with a bowl of soup?'
Over the last few months, I've been exploring, promoting and supporting recipes that try to take away as much of the strain from the baker as possible. Recipes and techniques that get back to the basics of taste and nutrition. Recipes that fit in easily with busy lifestyles and the needs of families.
There are numerous 'no-knead' recipes and others that require you to Mix, Wait and Bake. There are one-step recipes and one-pot recipes. There are cold bakes and 'come back tomorrow' bakes.
And then there are those recipes that require a fair amount of energy, input and time.
Today, it's going to be slightly different. Today, there is work to be put in to achieve a sourdough with an 80% hydration.
It's a lengthier process than usual and one with specific stages. So, to help, I'm timing the whole process so you can see how it works.
OK to start:
THE BAKER'S PERCENTAGE - for an 80% hydration
100% flour
20 % freshly fed and activestarter
80% water
2 % salt
How does this translate into quantities?
100 gms of freshly-fed starter (1:1:1) - fed with rye flour and filtered water
500 gms flour (450 gms strong white flour and 50 gms of wholemeal)
390 gms filtered water (or own-brand bottled still water)
7 gms sea salt.
(Total flour = 450 + 50 + 50 = 500 / Total water = 390 + 50 = 440)
METHOD (Of course, you can change the start time to suit yourself)
6 a.m.
Mix 500 gms of flour (as above) and 390 gms of water. Cover and leave at room temperature for 4 hours.
10 a.m.Add 100 gms of active starter, mix well (4 minutes) and leave at room temperature for 30 minutes
10.30 a.m.
Add 7 gms of sea salt. Dimple in the salt and mix for about 5 minutes. Rest at room temperature for 30 minutes.
11.05 a.m.
Mist the countertop. Gently tip the dough out and stretch it in all four directions. Fold it inwards, each side at a time until you have a parcel.
Return to the bowl, cover and rest for 30 minutes.
11.40 a.m.
Mist the countertop. Gently tip the dough out and stretch it in all four directions.
Laminate the dough by folding the right hand side inwards by one third. Repeat with the left hand side.
Then, fold the bottom upwards by about one third and the top downwards, until you have created a parcel.
Move to a bulking dish. Cover and rest for 45 minutes.
(A bulking dish can be a large shallow plastic box or a glass 'lasagne-style' dish)
12.15 p.m.
Coil fold #1
Cover the dish and leave in a warm place for 45 minutes.
12. 45 p.m.
Coil fold #2
Cover the dish and leave in a warm place for 45 minutes
1.15 p.m.
Coil fold #3
Cover the dish and leave in a warm place for 1 - 2 hours.
Timings
If you are working at approximately 20 degrees C then you should be ready to shape approximately six hours after adding the starter. For every degree above this, subtract 15 minutes. For every degree below this, add on a further 15 minutes. However, this is not a 'fine science'. Your best guide are your eyes and your experience.
3.15 p.m.
Very gently, tip the dough out onto a lightly floured countertop.
Very gently, whilst protecting the gas and air bubbles within the dough, bring in the edges into the centre and then turn the dough over to form a boule.
Very gently, draw the dough down the the worktop towards you to create tension on the surface of the dough.
Rest the dough for five minutes.
Generously flour a banneton.
Reform the dough into a boule and draw it down towards you again to reinforce the surface tension.
Place the dough in the banneton, flour and cover with a shower cap.
Place in the fridge (3⁰C) - bottom shelf - for at least 12 - 16 hours.
8.00 a.m.
Preheat the oven to 240⁰C.
If you are using a Dutch oven, bread cloche, cordierite baking stone or similar, remember to preheat this as well.
You may also use a cold oven start for this recipe.
Remove the banneton from the fridge and prepare to bake. There is no need to allow the dough to reach room temperature.
Score as desired.
Bake at 230⁰C for 20 minutes and then for a further 20 minutes at 220⁰C
Happy baking....


Comments
Post a Comment