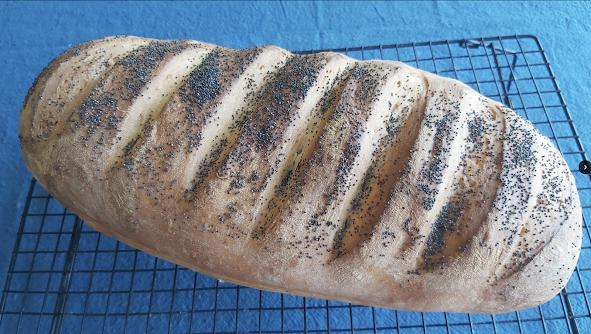
Poppy Seed Bloomer
Welcome to another step-by-step recipe from BreadClub20. Why not drop by our main Facebook page by clicking here.... If you like what you see and enjoy the recipe, we hope you go on to join us by 'Liking' and 'Subscribing'.
There are women's bloomers, the Bloomer potato, the early LNWR Bloomer railway locomotive class and the bloomer bread.
So, how did the bloomer loaf get its name?
The term 'bloomer' refers to the shape of the loaf. The dough is allowed to 'bloom', that is to say, rise during a free-form bake, away from the constraints of any bread tin or container.
It's gently rounded at the top with between 7 - 13 diagonal slashes. Why 7 - 13? Well, some say that 7 slashes are to represent the days of the week. One thick slice per day and a 7 day old rock-hard slice at the end, presumably. Others say that the 13 represents Christ and the Apostles.
I'm more inclined to see the slashes as a way to help the bread rise as part of the process of 'oven spring'.
Traditionally, the bloomer uses a high protein flour and less water than some breads...all there to help it 'bloom' and yet keep its shape while in the oven.
The key is in the ingredients and in the process....as we will see.
INGREDIENTS
675 gms strong white bread flour (protein level at least 12%)
430 mls of tepid filtered water
10 mls sea salt
1 heaped teaspoon of instant yeast
For the topping:
½ teaspoon salt
30 mls water
poppy seeds
This loaf has a hydration level of 63%. This is necessary to guarantee the 'bloom' while it is in the oven.
METHOD
Stage 1
If you're mixing by hand or using a stand mixer, add the salt to the flour and mix thoroughly. Slowly add the liquid and then the yeast until you have a sticky mix. Turn the mix out onto a floured board and knead until you have a silky and pliable dough. (There are 'Help' videos and articles in the 'Useful Web and YouTube links' on the left hand side of this page). Place the dough in an oiled bowl and cover.
Leave for between 5 - 6 hours in a cool room (15⁰C - 18⁰ C) until the dough has doubled in size.
 |
| Mixed and ready for first rise ( 5 - 6 hrs at 18⁰C) |
Stage 2
Knead it thoroughly for a further five minutes and then return to the bowl, cover and keep at the same cool temperature for a further two hours.
Stage 3
Knead it thoroughly again for five minutes and then let it rest for 5 minutes.
Roll out on the same floured surface into a rectangle, approximately one inch thick.
Roll the dough from the long side and shape it into a baton or bâtard shape about 13 inches by 5 inches. (33 cms x 13 cms)
Stage 4
Grease a baking sheet.
Place the loaf SEAM SIDE UP on the baking tray and leave for 15 minutes.
Turn the loaf over so that it is SEAM SIDE DOWN and plump up the dough by tucking the dough in at the sides and at the ends.
Cut 7 diagonal slashes from end to end (or 13 if you're feeling religious).
Leave to rest for 10 minutes in a warm place.
Stage 5
Heat the oven to 230⁰C.
Mix the salt and water together (see 'topping' above)
Brush the glaze over the bread.
Sprinkle with poppy seeds.
Mist the loaf with water and bake for 20 minutes.
Drop the temperature to 200⁰C and bake for approximatelya further 25 minutes until golden.
Transfer to a wire rack and allow to cool.
Happy baking...


Comments
Post a Comment