Welsh Clay Pot Loaves (Bara Pot Clai)

Welcome to another step-by-step recipe from BreadClub20. Why not drop by our main Facebook page by clicking here.... If you like what you see and enjoy the recipe, we hope you join us by 'Liking' and 'Subscribing'.
When my Welsh daughter married her Dutch husband, she asked me to make a hundred and so Welsh clay pot loaves for the wedding reception. I used 3-inch clay pots from the garden centre - after all, they only needed bread for the first course, not to take home for toast the next day.

Actually, the tradition of baking bread in clay plant pots dates back over 150 years. In Welsh, it's known as Bara Pot Clai..more or less a straight translation would be Clay Pot Bread.
The key is to prepare your unglazed clay pots. They must be unglazed. You can use any size. It's the quantity of dough that is important, so having a range of sizes to hand is useful. You can use large pots or small pots if you wish. Once the dough has had its first proof, you're going to create a ball large enough to half-fill the pot. Then when the dough has risen, during the second proof, and is within a half inch of the top of the pot, it's ready to glaze, add toppings and bake.
Prepare the pots. Place them on a baking tray and into a cold oven. Heat the oven to 220C and bake the pot for 30 minutes. Turn the oven off and allow the pots to cool down inside the oven.
Repeat the process. After the second bake, the pots will be ready for use. Don't wash the pots, just wipe them out using a piece of kitchen paper and a spot of olive oil.

350 gms strong white bread flour
150 gms wholemeal/wholegrain flour
1 teaspoon crushed sea salt
7 gms dried yeast
100 gms tepid skimmed milk
250 gms tepid water
1 tablespoon honey or 1 tablespoon Muscovado/ Demerara sugar
3 tablespoons olive oil or 50 gms unsalted butter (melted)
for the glazing
a beaten egg
for the toppings.
If you wish, you can experiment with toppings. Some suggestions might be (on their own or in combination):
seeds in general (fennel, caraway, poppy, chia, sesame, linseed, pumpkin, sunflower, etc.)
rolled oats
chopped fresh chives
chopped fresh parsley
chopped fresh sage
crushed garlic
Parmesan cheese
The combination is up to you...just think about the effect they will have on the palate.
Alternatively, you can add a few seeds to the dough mix rather than using them as toppings and just sprinkle poppy seeds on top of the glaze.
How many pots do I need....remember that you have 500 gm mix? You may start with a 5-inch pot or some smaller pots. Have a range to hand. You can always double the mix if you wish and bake more.
You'll also need to place a small circle of parchment paper in the bottom of each clay pot....to cover the drainage hole.

METHOD
1. Prepare the pots and lightly oil the insides or spray with a pan release.
2. Mix the yeast with a little of the tepid milk and set aside for 15 minutes in a warm place until it starts to bubble.
3. Sift the flour into a large bowl and mix in the salt.
If you intend to add seeds to the dough at this stage, rather than, or in addition to, a final topping, then add them now.
4. Add the melted butter, the water and the remaining milk and bring them together into a clump.
5. Tip out onto an un-floured surface and knead until you have a soft and silky dough.
6. Place the dough in a lightly oiled bowl. Turn the dough so that all the surface is oiled and then cover. Place in a warm place for about an hour - or until it has doubled in volume. It may take slightly longer so

7. Turn the dough out onto a lightly floured surface and knock it back to remove the air bubbles.
8. Divide the dough so that there is enough to half-fill the clay pot. Form into a ball and place the dough into the clay pot.
.jpeg) |
| 654 gms half fills a 6-inch pot. |
.jpeg) |
| This is a double mix - the small 3-inch pots take 90 gms of dough |
11. Preheat the oven to 200⁰C. Place the pots on a baking tray and glaze them with an egg wash. Add the toppings of your choice.

12. Bake for 30 minutes or until the bread is golden and hollow when tapped underneath.
13. Remove the bread from its pot and cool it on a rack. Allow the pots to cool naturally.
14. If you then wish, you can return the bread (cooled) to the pot (cooled) for presentation.
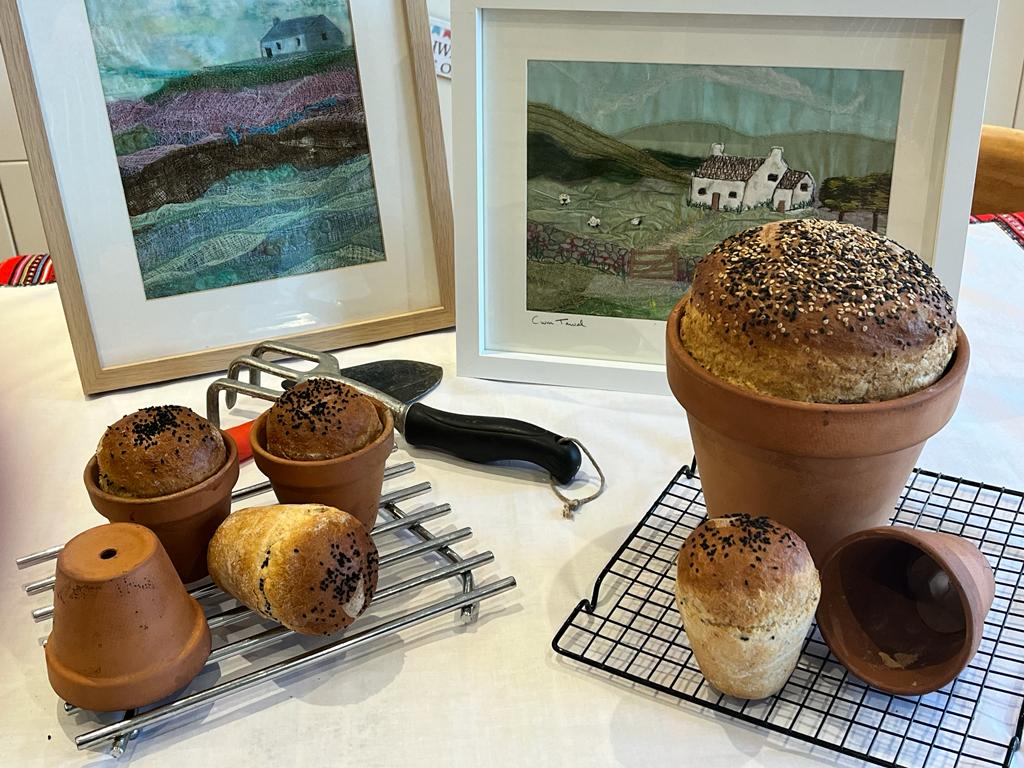

You can present the bread by placing it back into the pot and serving it at the table. The pots can be decorated by tying jute string or ribbon to make them look more attractive. If you use small pots, brown luggage labels can personalise the bread for your guests.

(creative textiles by Pwyth a Bwyth)
https://www.facebook.com/search/top?q=pwyth%20at%20bwyth%20%3A%20stitch%20by%20stitch
Happy baking...
For Printing
.png)
My loaves are nearly ready to come out. 1 cup of leftover mashed potatoes and the rest unbleached all purpose flour. 400 F for 30 minutes - still doughy so another 30 minutes at 375 F. Photos will be on the Facebook page soon.
ReplyDelete